Well we are finished once again for another year. It comes and goes so quickly these days and I spend most of it both loving and fearing the experience. I'm someone who thoroughly enjoys speaking to an audience but loathes the anticipation of it all. Well thats not strictly true. I look forward to the event until just before it when the nerves take over and turn my stomach upside down. And then when its all over I want to do it all over again. I'm already thinking of ideas for next year.
(If you have anything you wish to see please get in touch. New ideas are always welcome)
I have to admit I was pretty impressed with the turnout for the demos on the Bowens stage. Each time I participate in one of these events I wonder just how many people will be interested in what I have to say. And each time I feel honoured and proud to see such a large audience. It was a fantastic experience and one I feel very lucky to be a part of. I asked for these images to be taken not because I like seeing myself in pictures because trust me I do not, but because this is a memory I wish to keep as it really does mean a lot to me.
I had an especially good time this year because I was lucky enough to have my daughter model for me. Its never been something she has been keen on, which is understandable, but this year something changed for her and she was interested in joining me. She even seemed to enjoy herself which I know is something teenagers rather not admit. I can honestly say that she made me very proud and its been a joy to edit these images.

Anyway, for those who attended the event and wanted to see the finished images I thought I'd share them here for you. I wasn't sure how many images I'd get from the stage as its not really the best circumstances to get the sort of images I aim to create. While my head is trying to keep track of all I want to say I'm not always paying enough attention to the details in the image. Nor do we have the space to lay out our backdrops as we'd want or place the lights precisely where they need to be in some cases. But overall all I am happy. There are a few issues in these images but I can live with them given the limitations on the day.

This year I did two different demonstrations. The first was that of a simple portrait using 2 lights, each with large softboxes. For the keylight I used the 120cm octobox and the fill light used the 100cm softbox. In all cases I used Bowens' new Generation X kit, the XMT 500's which are designed for location work as they are battery powered. I know these are not location type portraits, nor do I go on location where I am without mains power, however having now used these lights in my own studio since January I would hate to have to give them up. The freedom of no cables is considerably more enjoyable and noticeable than I anticipated so I'll be sticking to these for the foreseeable future.

The other great feature of these lights is that they are not just high power, but also low powered. So many things in life high power is the desirable feature but when it comes to lighting my portraits its actually low power I am after most often. Lower power allows me to shoot at wider apertures which is something I often do. Here I was shooting at F5.6 and I was still able to have my fill light at F2 and I wasn't even on the lowest power. These lights work perfectly for me. And I've not even mentioned the fab triggers yet that allow me to control everything from the camera. I must write a review of these lights and I promise to do that soon.

While I was on stage I decided to use the Bowens Jetstream wind machine as well. I've started using this in my shoots and I love it. I find it really adds something to the portraits that make them stand out and it does so in a way that a blow dryer just can't, particularly if you don't have an assistant. For these I was able to set the machine beside me and well out of the way and I could control it while still shooting. It gives beautiful volume to hair and on a hot stage it has the bonus of cooling down the model. At times I wished I could point it at me as it gets quite hot while demonstrating.

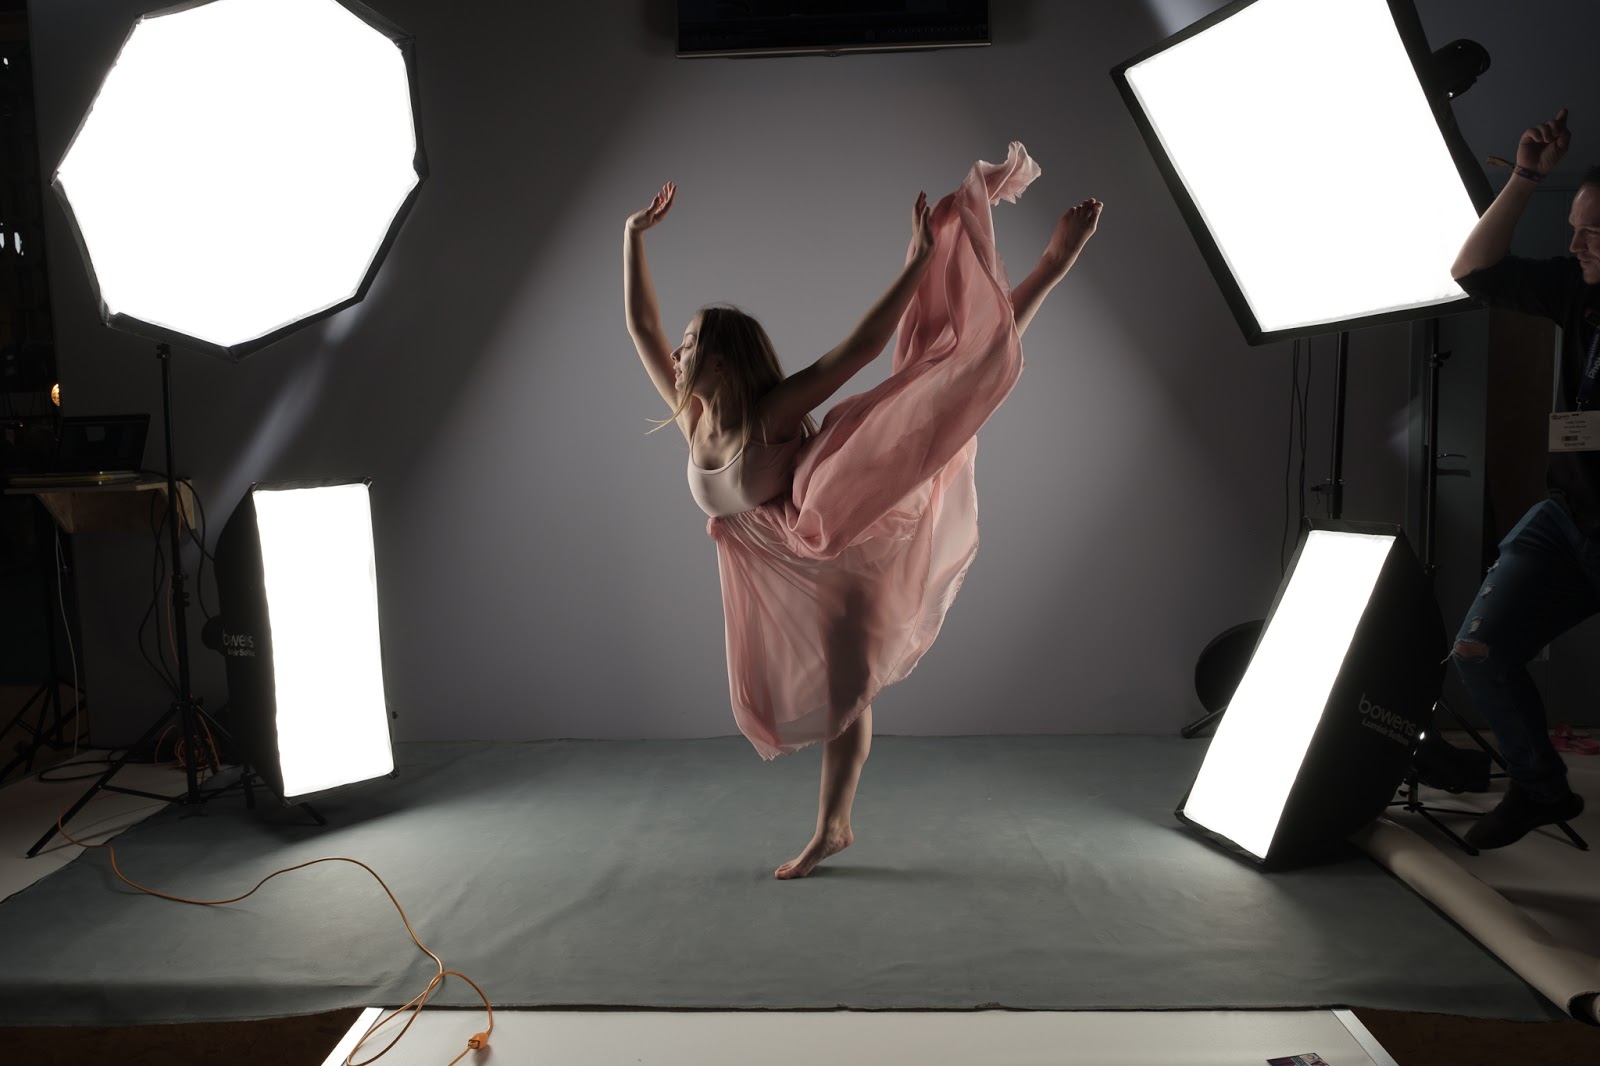
The second demonstration was titled Portrait of a Dancer: Learn to Light Artistically. For this I wanted to show that you can create a beautiful portrait without having a typical lighting setup that involves a light beside or above the camera. Instead all lights were placed behind the model, facing towards the camera, as in the image below. In the image below you can see how there is a rim light around the model's entire body. During this demonstration we began with one light and built up the lighting as we went adding additional lights along the way. Here all 4 were in use.
(This is the edited version of the image above - using content aware fill, cloning and textures I was able to make something of the background we had available. Ideally I would have used seamless paper but the stage just wasn't big enough for this)
It isn't necessary to use all 4 lights and to show this I began with just one. You may be wondering why I am using a variety of different softboxes. Well I thought it made sense to use what I have available to me and what I would imagine is typical of many studios. Few people have 4 of the same light modifiers so I used what I have myself. I kept the big ones to the top and the octobox was the light that was set to light our models face. I wanted this to be the biggest light so that I could get more coverage of her face rather than just a thin rim of light as we could expect from the strip boxes below.
(Only one light was used for the above portrait)
(For this image we had all 4 lights on - this also happens to be my favourite images, not just from the show but one of my favourites of all time)
Photography literally translated means writing with light and we were doing just that here. Its a matter of seeing the image and deciding where you want the light to fall and adding a light to illuminate that area. Both images above are quite effective but both were lit differently. The first had just one light where the second had 4. As the photographer and artist you can decide what you want lit and how much light you want to use. There is no right or wrong to it. As a general rule though, we do not want blown highlights are blocked up shadows. Aside from that though, anything goes. So go forth and create!
Well thats it for this year now. Time to start work on next year's demos. Like I said earlier, please let me know if there is anything you'd like to see. Its actually harder to come up with ideas for these things than you'd imagine.
For those who attended or sat through the live streams I hope you found it useful and inspiring. Thank you so much for giving me your time. Its very much appreciated. If you wish to keep up with me throughout the year here are the links to my social media accounts.
Instagram
Twitter
Facebook
Website


Comments